Rust と iced で GUI App を作る
定量的に行う作業を楽にするためにツールを作ることは多々あると思います。ツールを作る場合 CLI 向けに作れば十分なことがほとんどだと思いますが、作業によっては GUI を持つツールの方が良いことがあると思います。
Android Emulator や実機の Android を操作するためにリモコンが欲しかったので Rust と iced を使用し GUI App を作成しました。
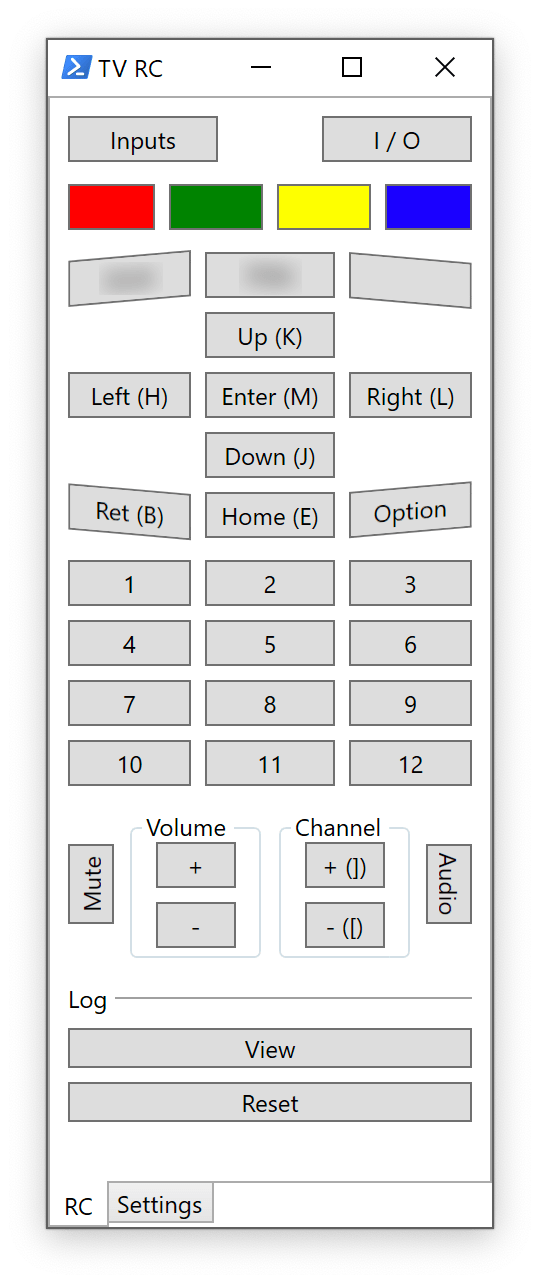
WPF on PowerShell
2013 年辺りでも PC から操作できるリモコンが欲しかったので当時は PowerShell で GUI App を作成していました。 PowerShell を選んだ理由は Windows 7 上で TextEditor があれば手軽に GUI が作れるからですね。
ボタンが押されたのでこのイベントを実行し Serial (UART) で送信、といったものをすべて PowerShell で記述し UI は別途 XAML を用意して PowerShell から読み込んで描画していました。
PowerShell は標準の Cmdlet では機能が足りないといった場合でも .NET であれば Add-Type -AssemblyName PresentationFramework -ErrorAction SilentlyContinue のようにすれば何でも使えるのが強いですね。
PowerShell の Cmdlet も Out-GridView を使えば何時何分にどのボタンをどれくらい長押しした、といった Object を渡せば Excel みたいにいい感じに表示してくれたり便利な機能がありいい感じです。

このリモコンはボタンが増えたりキーマクロのようにエージングテストの為に記録したキーを再生できるようにしたり、 Android を操作できるようにしたりと数年機能追加して活躍しました。
iced on Rust
使用する OS が Windows 10 になり、当時のコマンドプロンプトや PowerShell のキー入力が変わり、慣れ親しんだ操作感に戻すことができないため、たんだん PowerShell を使わなくなってしまいました。今では Windows Terminal があるのでそれ経由で PowerShell を使えば問題ないのですがメインの環境を MacBook Pro 移行し Bash 前提にカスタマイズした現状で満足しているので、今から PowerShell に戻ることはしたくないですね。
今はツールをすべて Rust で作っているので Rust で GUI を作れたら、、と探していたら iced Crate を見つけました。
iced は Metal / DirectX / Vulkan / OpenGL を使用して cross-platform に対応している点が、現在 macOS / Linux / Windows を日常的に使っているため魅力的でした。また、以前 ImGui を使った経験があったので、何となく使い勝手が近いかな、とか start の数で何となくで使ってみようと思いました。
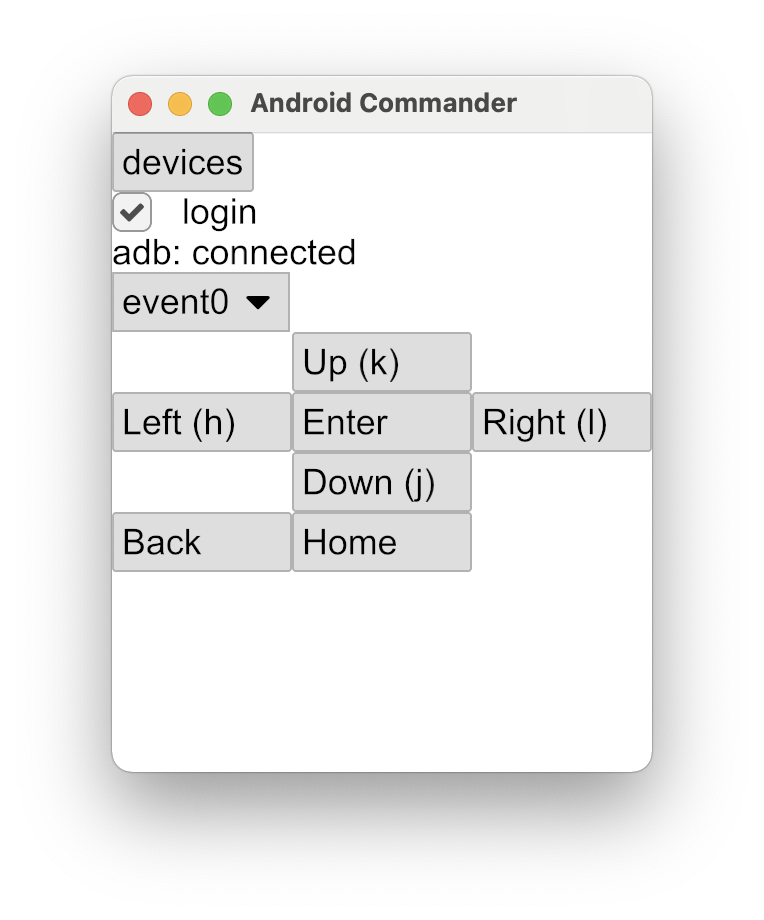
実装したものがこちらです:

解説記事がとても少ないので example を読みながら Hello world を実装し、それをベースに 1日前後でつくりました。 PowerShell 版と比べると視認性があんまり良くないですし最低限の機能だけですがとりあえず動きます。
iced で UI を作る
iced で UI を表示するためには iced の README にあるように Application trait の fn view() を実装し Flexbox 的に Component を詰め込んだものを返します。
struct MyApp {
    adb_connectivity: AdbConnectivity,
    adb_server_rx: tokio::sync::watch::Receiver<String>,
    adb_server_tx: tokio::sync::watch::Sender<String>,
    input_list: Vec<SendEventDevice>,
    pressed_key: std::collections::HashSet<SendEventKey>,
    sendevent_device: SendEventDevice,
    widget_states: WidgetStates,
}

impl Application for MyApp {
	// snip.
    fn view(&mut self) -> Element<'_, Self::Message> {
        let button_width = Length::Units(90);
        let button_height = Length::Units(30);

        Column::new()
            .push(
                Button::new(&mut self.widget_states.adb_button, Text::new("devices"))
                    .on_press(AppCommand::OnAdbButton),
            )
            .push(Checkbox::new(
                match self.adb_connectivity {
                    AdbConnectivity::Connecting | AdbConnectivity::Disconnected => false,
                    AdbConnectivity::Connected => true,
                },
                "login",
                |_| AppCommand::OnAdbConnectClicked,
            ))
            .push(Text::new(match self.adb_connectivity {
                AdbConnectivity::Connecting => "adb: connecting",
                AdbConnectivity::Connected => "adb: connected",
                AdbConnectivity::Disconnected => "adb: disconnected",
            }))
            .push(PickList::new(
                &mut self.widget_states.picklist_device,
                self.input_list.as_slice(),
                Some(self.sendevent_device.clone()),
                AppCommand::TargetDeviceChanged,
            ))
            .push(
                Row::new()
                    .push(Space::new(button_width.clone(), button_height.clone()))
                    .push(
                        Button::new(&mut self.widget_states.button_up, Text::new("Up (k)"))
                            .width(button_width.clone())
                            .height(button_height.clone())
                            .on_press(AppCommand::RequestSendEvent(SendEventKey::KeyDpadUpClick)),
                    ),
            )
            // snip.
            .into()
    }
}
このように Component を詰めて UI を作っていきます。 Button が押されたりすると (Application を実装した) MyApp の値が更新され、ボタンが押されたという Event を fn update() によって知ることができるので、 update にボタンが押されたときの動作を実装していきます。
fn update(&mut self, message: Self::Message) -> Command<Self::Message> {
    use AppCommand::*;

    match message {
        OnAdbButton => {
            info!("update OnAdbButton");
            return Command::perform(invoke_adb(), |_| AppCommand::InvokeAdbResult);
        }
        OnAdbConnectClicked => match self.adb_connectivity {
            AdbConnectivity::Disconnected => {
                self.adb_connectivity = AdbConnectivity::Connecting
            }
            AdbConnectivity::Connecting => {
                warn!("TODO");
            }
            AdbConnectivity::Connected => {
                self.adb_connectivity = AdbConnectivity::Disconnected;
                self.adb_server_tx.send("".into()).ok();
            }
        },
        RequestSendEvent(data) => {
            info!("update RequestSendEvent: {:?}", data);
            // snip.
        }
        TargetDeviceChanged(device) => {
            self.sendevent_device = device;
        }
    }
     Command::none()
}
簡単な App であれば
- view() で状態を読み取り UI を作る
- update() で状態を更新する
- view() で状態を読み取り UI を作る
- update() で状態を更新する
- //
- update() で状態を更新する
- view() で状態を読み取り UI を作る
- update() で状態を更新する
というように view() と update() の Main Loop で動く App を作っていきます。
非同期処理を実行する
update() が呼ばれたときに HTTP でファイルをダウンロードするような IO が発生する処理や計算量の多い処理をする場合は上記コードの
Command::perform(invoke_adb(), |_| AppCommand::InvokeAdbResult)
のように Command::perform() を使用します。これにより第一引数の async { foo(); } な関数を実行し、完了したら第二引数の fn bar(第1引数の関数の戻り値) { baz } が呼ばれ、その戻り値により update() が呼ばれます。つまり
- view() で Button を描画
- Button を押す
- update() が呼ばれ Command::perform(a, b) を実行
- a() を実行
- a() の戻り値により b() を実行
- b() の戻り値により update() を実行
- update() の引数により状態を更新
- view() で状態を描画
- update() の引数により状態を更新
- b() の戻り値により update() を実行
- a() の戻り値により b() を実行
- a() を実行
- update() が呼ばれ Command::perform(a, b) を実行
- Button を押す
ということになります。
長時間動く Background 処理を実装する
UI に紐付かない長時間裏で動く処理、たとえば Android の Service のようなことをしたい場合は Subscription を使用します。
Subscription を使用することで裏の Worker thread で動き続けている処理から Rx の Subject のように値を Main thread に送り続ける、といったことができます。
iced の example では Download progress が Subscription を使用しています。 Download progress は裏でファイルのダウンロードをしつつ定期的に進捗を Main Thread に流すことで Progress bar を更新する、といったことをしています。
今回のリモコン App でもリモコン App が Android と通信するために adb を使用する箇所で Subscription を使用しています。 App の [ ] login のチェックが入ったら Subscription を起動し adb を常駐させ Main thread と通信を行います。
fn subscription(&self) -> Subscription<Self::Message> {
    match self.adb_connectivity {
        AdbConnectivity::Connecting | AdbConnectivity::Connected => Subscription::batch(vec![
            Subscription::from_recipe(AdbServerRecipe {
                rx: self.adb_server_rx.clone(),
            })
            .map(AppCommand::AdbServerRecipeResult),
            iced_native::subscription::events().map(AppCommand::Event),
        ]),
        AdbConnectivity::Disconnected => Subscription::none(),
    }
}
この Subscription は rx (tokio::sync::watch::Receiver<String>) を抱えています。これは iced の仕組みとして Subscription から Main thread に値を流すことはできますが、逆に Main thread からすでに起動している Subscription に対して値を渡すことができないため、それを可能にするために抱えています。
Subscription の実装はちょっと長いですが次のようになります:
#[derive(Clone, Debug)]
enum AdbServerRecipeEvent {
    Connected,
    Disconnected,
    Error,
}

enum AdbServerRecipeInternalState {
    Init(tokio::sync::watch::Receiver<String>),
    Ready(tokio::sync::watch::Receiver<String>, std::process::Child),
    Disconnecting,
    Finish,
}

impl<H, I> Recipe<H, I> for AdbServerRecipe
where
    H: std::hash::Hasher,
{
    type Output = AdbServerRecipeEvent;

    fn hash(&self, state: &mut H) {
        std::any::TypeId::of::<Self>().hash(state);
    }

    fn stream(self: Box<Self>, _: BoxStream<I>) -> BoxStream<Self::Output> {
        use AdbServerRecipeEvent as RecipeEvent;
        use AdbServerRecipeInternalState as RecipeState;

        Box::pin(futures::stream::unfold(
            RecipeState::Init(self.rx),
            |state| async move {
                match state {
                    RecipeState::Init(rx) => match std::process::Command::new("adb")
                        .arg("shell")
                        .stdin(std::process::Stdio::piped())
                        .spawn()
                    {
                        Ok(mut data) => match &data.stdin {
                            Some(_) => Some((RecipeEvent::Connected, RecipeState::Ready(rx, data))),
                            None => {
                                warn!("stdin not found");
                                data.kill().ok();
                                data.wait().ok();
                                Some((RecipeEvent::Error, RecipeState::Finish))
                            }
                        },
                        // snip.
                    },
                    RecipeState::Ready(mut rx, mut child) => {
                        loop {
                            if rx.changed().await.is_err() {
                                break;
                            }

                            let data = rx.borrow();
                            debug!("send data: {}", data.as_str());

                            // for ignore init value.
                            if data.is_empty() {
                                continue;
                            }

                            let ret = writeln!(child.stdin.as_mut().unwrap(), "{}", data.as_str());
                            if let Err(e) = ret {
                                warn!("{:?}", e);
                                child.kill().ok();
                                child.wait().ok();
                                return Some((RecipeEvent::Error, RecipeState::Disconnecting));
                            }
                        }

                        debug!("channel closed");
                        child.kill().ok();
                        child.wait().ok();
                        Some((RecipeEvent::Disconnected, RecipeState::Finish))
                    }
                    RecipeState::Disconnecting => {
                        Some((RecipeEvent::Disconnected, RecipeState::Finish))
                    }
                    RecipeState::Finish => {
                        None
                    }
                }
            },
        ))
    }
}

impl Application for Hello {
    fn update(&mut self, message: Self::Message) -> Command<Self::Message> {
        use AppCommand::*;

        match message {
            AdbServerRecipeResult(data) => match data {
                AdbServerRecipeEvent::Connected => {
                    info!("adb connected");
                    self.adb_connectivity = AdbConnectivity::Connected;
                }
                AdbServerRecipeEvent::Error => {
                    info!("some error occurred");
                }
                AdbServerRecipeEvent::Disconnected => {
                    info!("adb disconnected");
                    self.adb_connectivity = AdbConnectivity::Disconnected;
                    self.adb_server_tx.send("".into()).ok();
                }
            },
            // snip.
        }
        // snip.
    }
}
Recipe trait の fn hash() は定型文でこのように書いておきます。
Main thread (Application trait の fn subscription()) から何回も呼ばれるため、ここで違う hash を設定すると以前の Recipe を破棄し新しく Recipe を起動します。逆に言えば 1種類の Subscription を定義して fn subscription() から複数の Subscription を渡しそれぞれ処理をさせたい場合はここでそれぞれ Unique な hash を設定する必要があります。
fn stream() は futures::stream::unfold を使用して少々複雑なことになっていますが戻り値に注目すれば簡単に読めると思います。
たとえば Some((RecipeEvent::Connected, RecipeState::Ready(rx, data))) のように (A, B) な Tuple を抱えた Option を return していますがこの return した A は Application trait の fn update() に渡され、この iced の仕組みにより Subscription から Main thread に値を渡すことができます。
return した B は Main thread に値を渡した後、引き続き処理を続行する為に使用する Subscription の状態です。この実装を例にすると
- B::Init で Subscription を起動
- Main thread に A::Connected を送信
- 次に B::Ready に遷移
- Main thread に A::Connected を送信
- B::Ready で adb との接続を確立・ Main thread からの command を受け取り通信
- rx で受け取った値を adb に送信
- adb の通信でエラーが発生したら Main thread に A::Error を送信
- 次に B::Disconnecting に遷移
- adb の通信でエラーが発生したら Main thread に A::Error を送信
- Main thread で
[ ] loginのチェックを外したら A::Disconnedted を送信- 次に B::Finish に遷移
- rx で受け取った値を adb に送信
- B::Disconnecting で切断
- Main thread に A::Disconnected を送信
- 次に B::Finish に遷移
- Main thread に A::Disconnected を送信
- B::Finish で None を返すことで Subscription を終了
といったことをしています。
まとめ
ちいさい GUI App を作ることができました。
複数の画面を持つような大きめの App を作る場合は設計を確立する必要がありそう。 Subscription はつらい。
refs.
https://github.com/hecrj/iced
https://github.com/ocornut/imgui
https://github.com/sukawasatoru/android-commander
timestamp
2021-02-13 (First edition)